Welcome to Lead Assign.This walkthrough will prepare your agents on how to navigate Lead Assign. Giving them the tools they need to close every lead efficently.
This guide will cover:
1. Accepting a Lead.
Lead Acceptance emails, and how to accept a lead.
2. Multi-Lead Management
It’s easier for salespeople to manage all their leads from one location, the most obvious of which is the new desktop lead view.
3. Providing Lead Feedback
Providing lead feedback by using the ease to use conversion feature is important.It helps your marketing team gauge the success and quality of the leads they are generating for you in real time.
4. Closing a Lead.
losing a lead includes recording the won/ lost reason so your team can accurately track performance.
5. All the emails you receive.
Lead Acceptance emails, notification emails, and requested updates to lead pursuit.
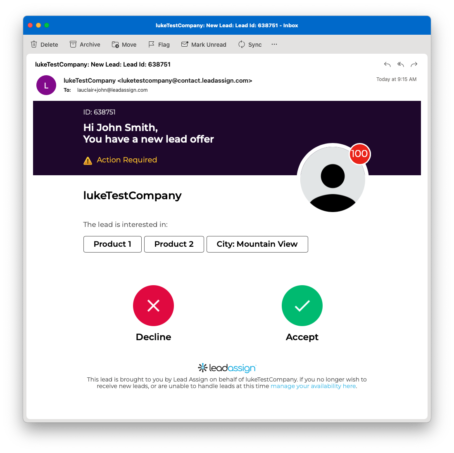
Accepting a Lead
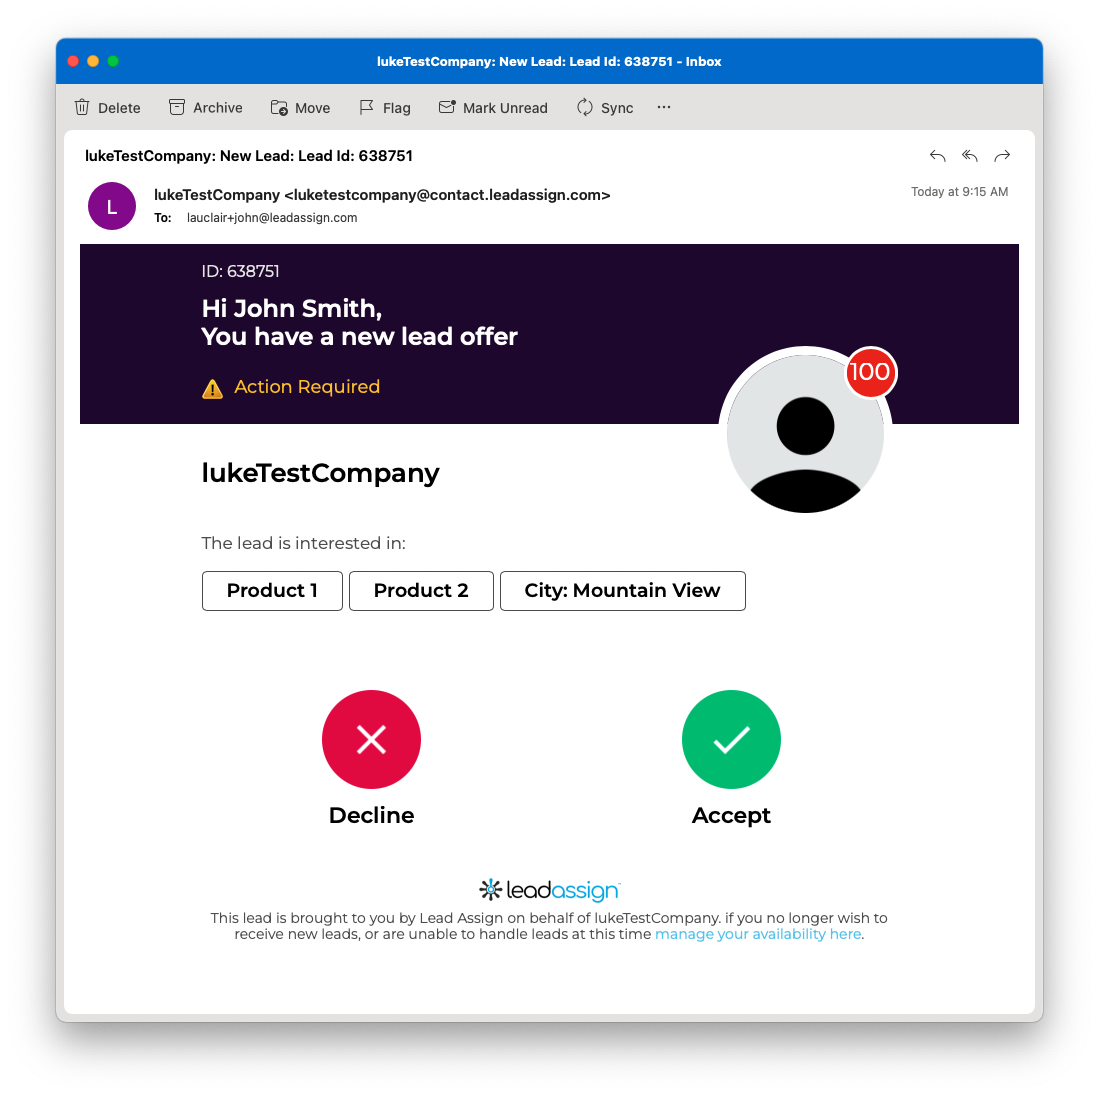
When you receive a lead opportunity as an email or an sms, simply click on the “Accept or Decline” button. If accepting via a mobile device you can accept via SMS or via Email.
Lead acceptance is not fastest finger. If you receive a lead offer it is exclusive to you for a limited time, but you must take action to accept the lead!
Best Practices:
Inspect the lead “hints” in the email. It can include product of interest, location, role before accepting the lead.
Accepting the lead upon receipt ensures you receive the lead and increases lead velocity.
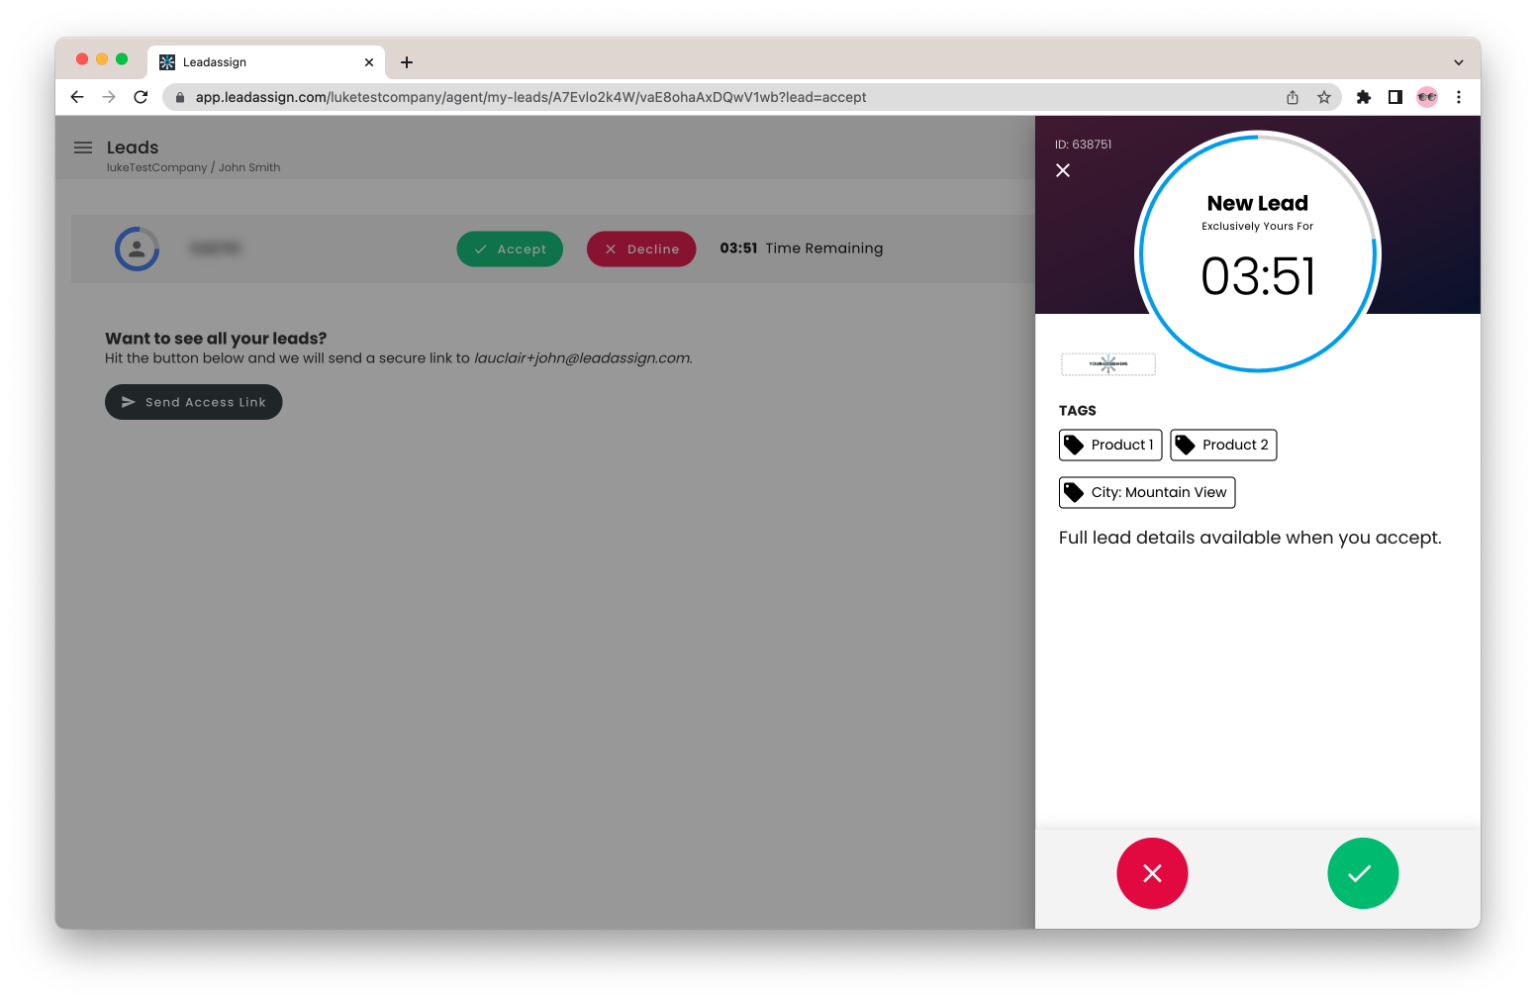
If clicked in time you will be taken to a screen with a countdown timer, and some details about the lead.
The lead contact information and key details are not available to you unless you accept the lead. The information provided about the lead includes product interest, expected purchase timeframe, budget, and the overall location.
Accepting the lead will assign it to you exclusively.
Best Practice:
It has been proven that contacting leads in under 2 hours results in an increase of up to 50% in the likelihood of a lead closing.
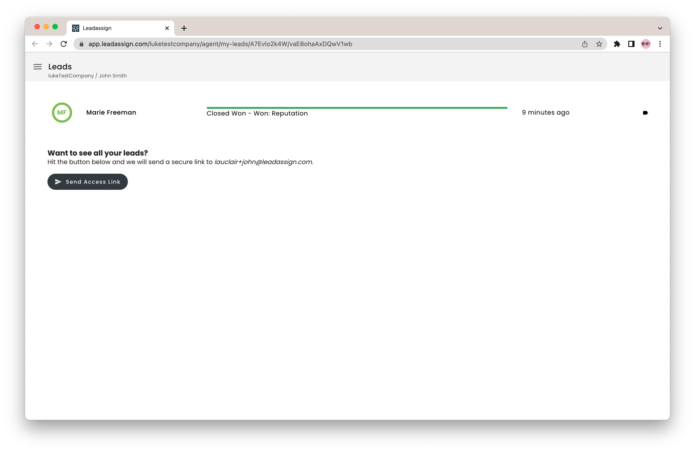
Click the “Send Access Link” after accepting the lead to receive a link to your all my leads page.
Browser with Lead Details
Interface Tips:
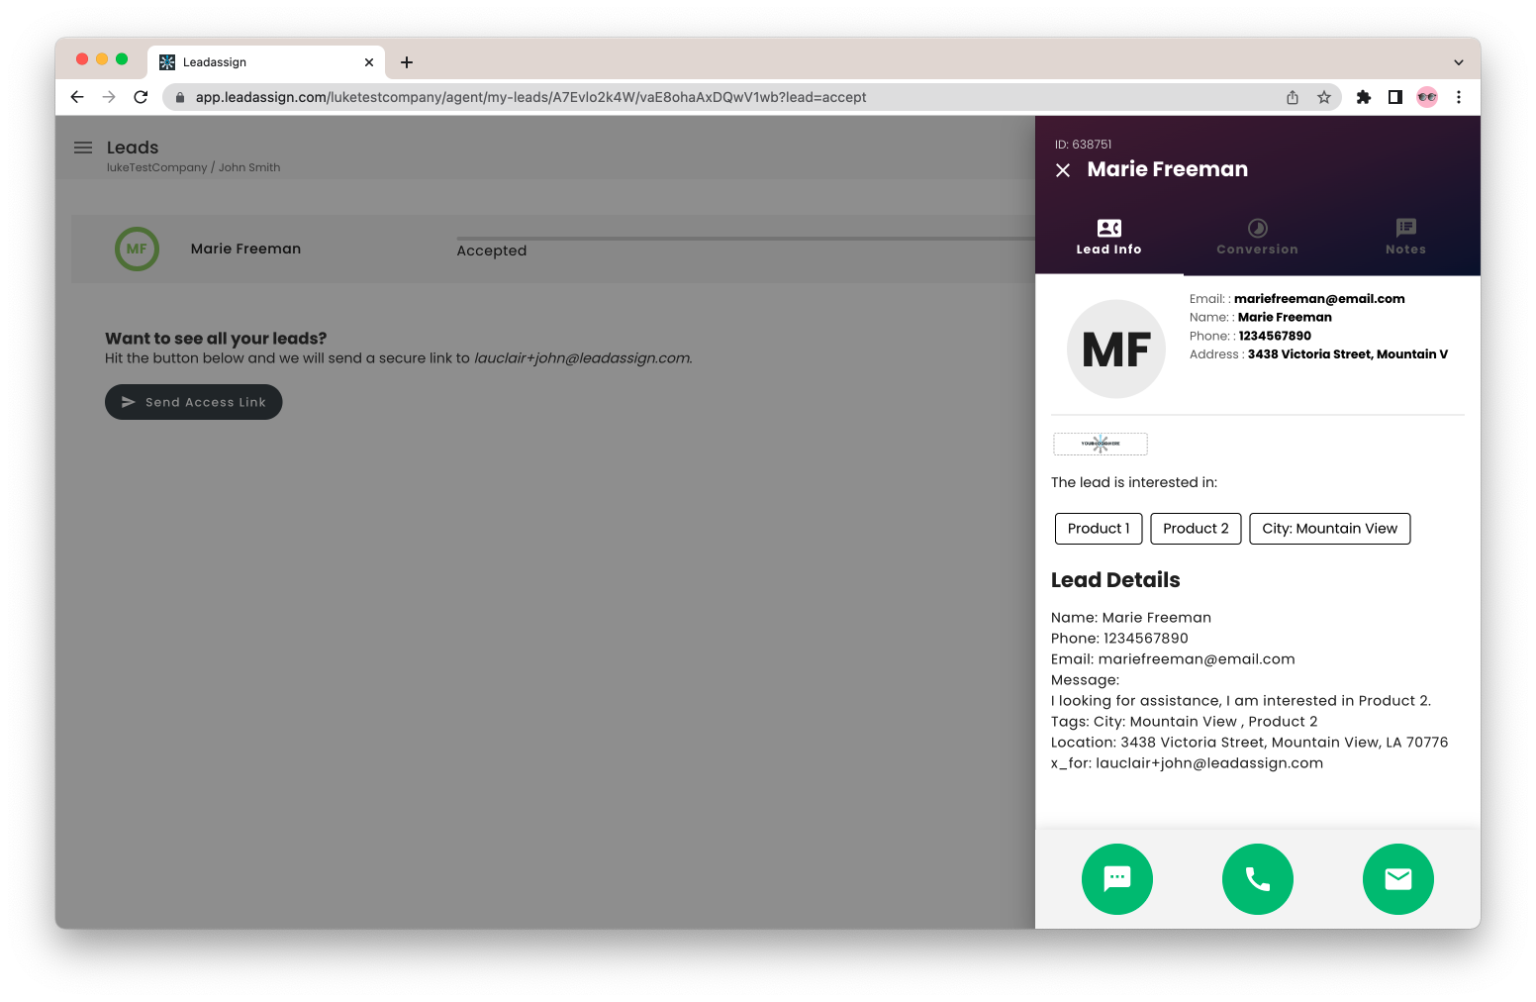
If you are working on your desktop clicking the email icon will launch the email client with the contact info populated.If you are on your mobile device you can click to call, text, or email.
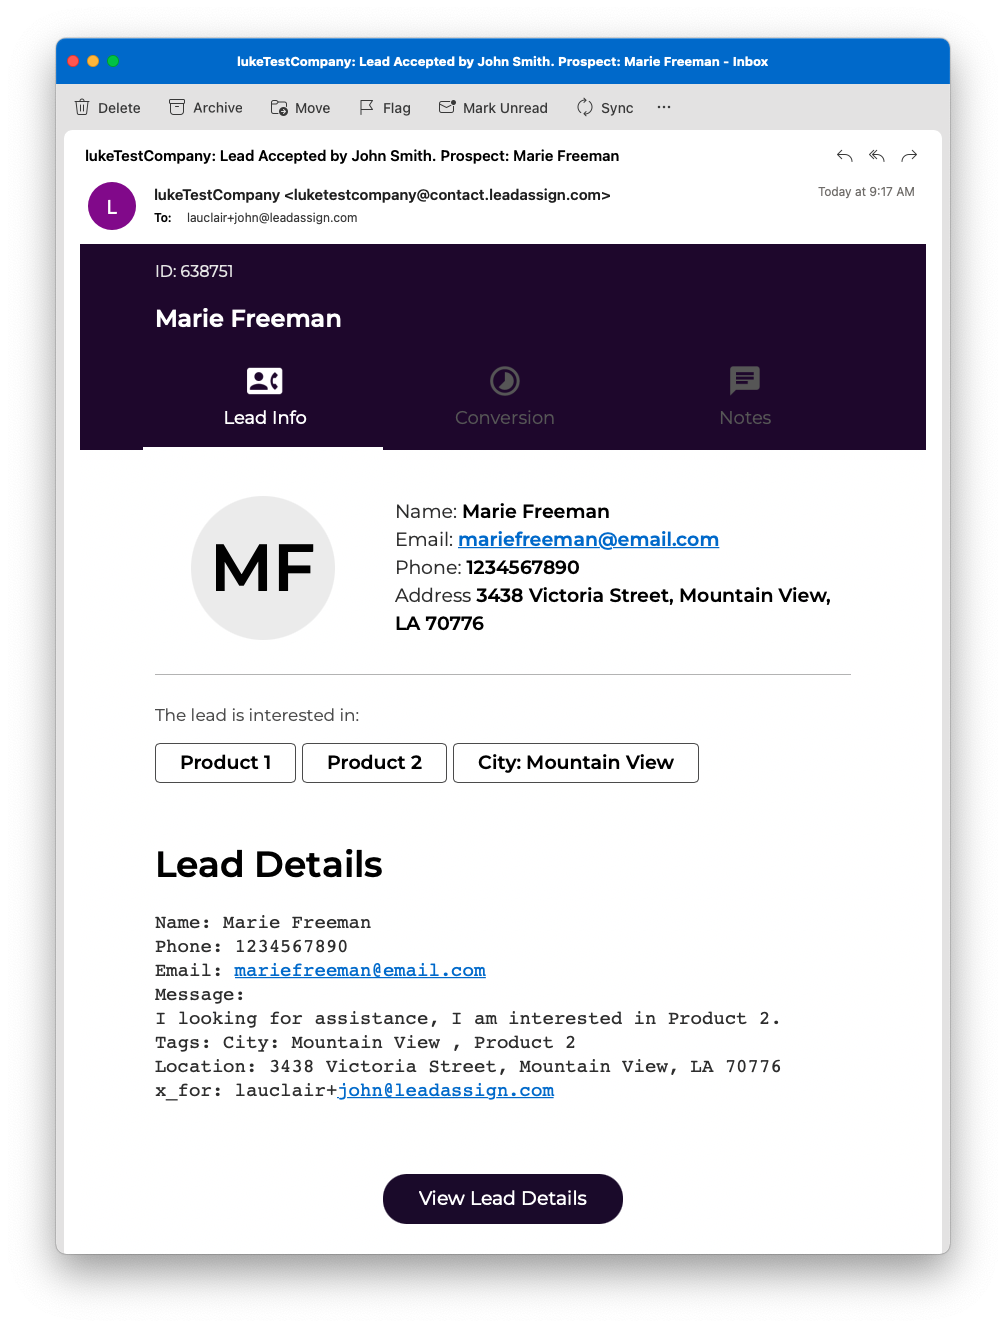
Once accepted you will immediately be taken to the lead details and receive an audit email with the lead details and the lead information, clicking anywhere in the email will take you to your lead pursuit dashboard.
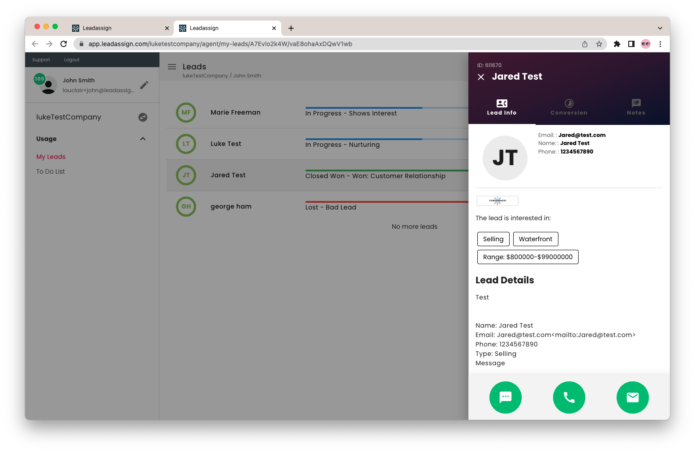
The lead contact information and key details are now available to you. Clicking any of the icons will allow you to email, text, or call the lead. (Click to call will only work on your mobile device or desktops with Facetime like capabilities).
Email with Lead Details
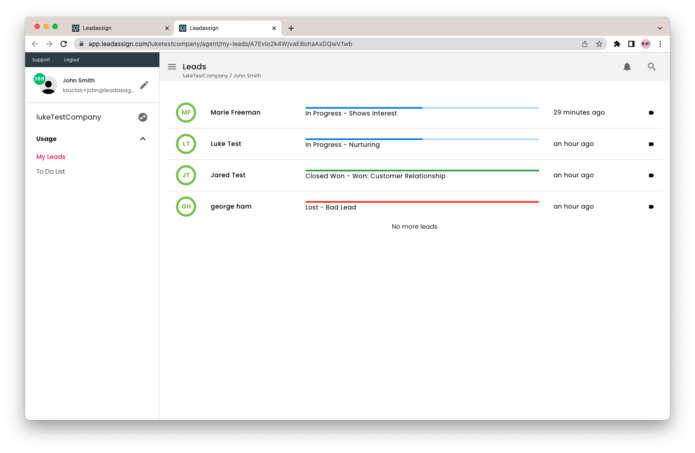
Managing All Your Leads From a Single Location
One of the major updates allows you to view all your leads via a secure verification link. This will send a link to your inbox allowing you to access multiple leads at once without having to log in.
CLick the “Send Access Link” button to the left of the screen and you will be emailed a link to all of your leads.
Manage All My Leads is a function that allows you, the agent, to manage your leads and adjust your availability settings.
Any lead that you have accepted or been assigned will be available for you to access.
You can scroll through each of your leads and then tab through the functions in the pane. This makes it easy for you to update the conversion status of multiple leads at once.
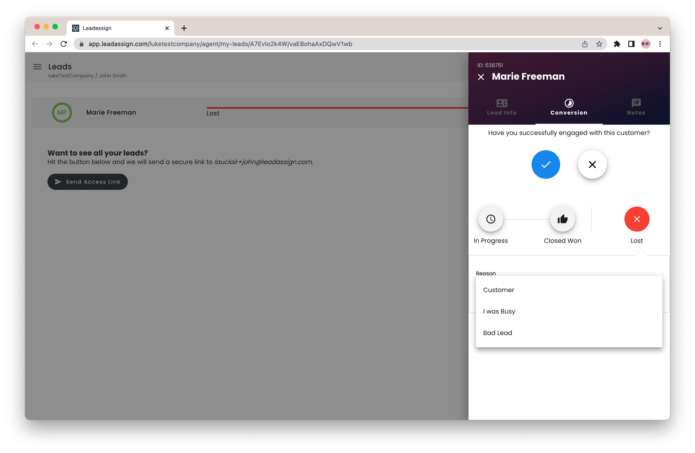
Providing Lead Feedback
Providing lead feedback by using the ease to use conversion feature is important.It allows your marketing team to gauge the success and quality of the leads they are generating for you in real time.
You’ll receive a weekly email asking for feedback on leads where feedback on your pursuit has not been provided.Click on the provide feedback button on any of the outstanding lads and you’ll be taken directly to that lead.
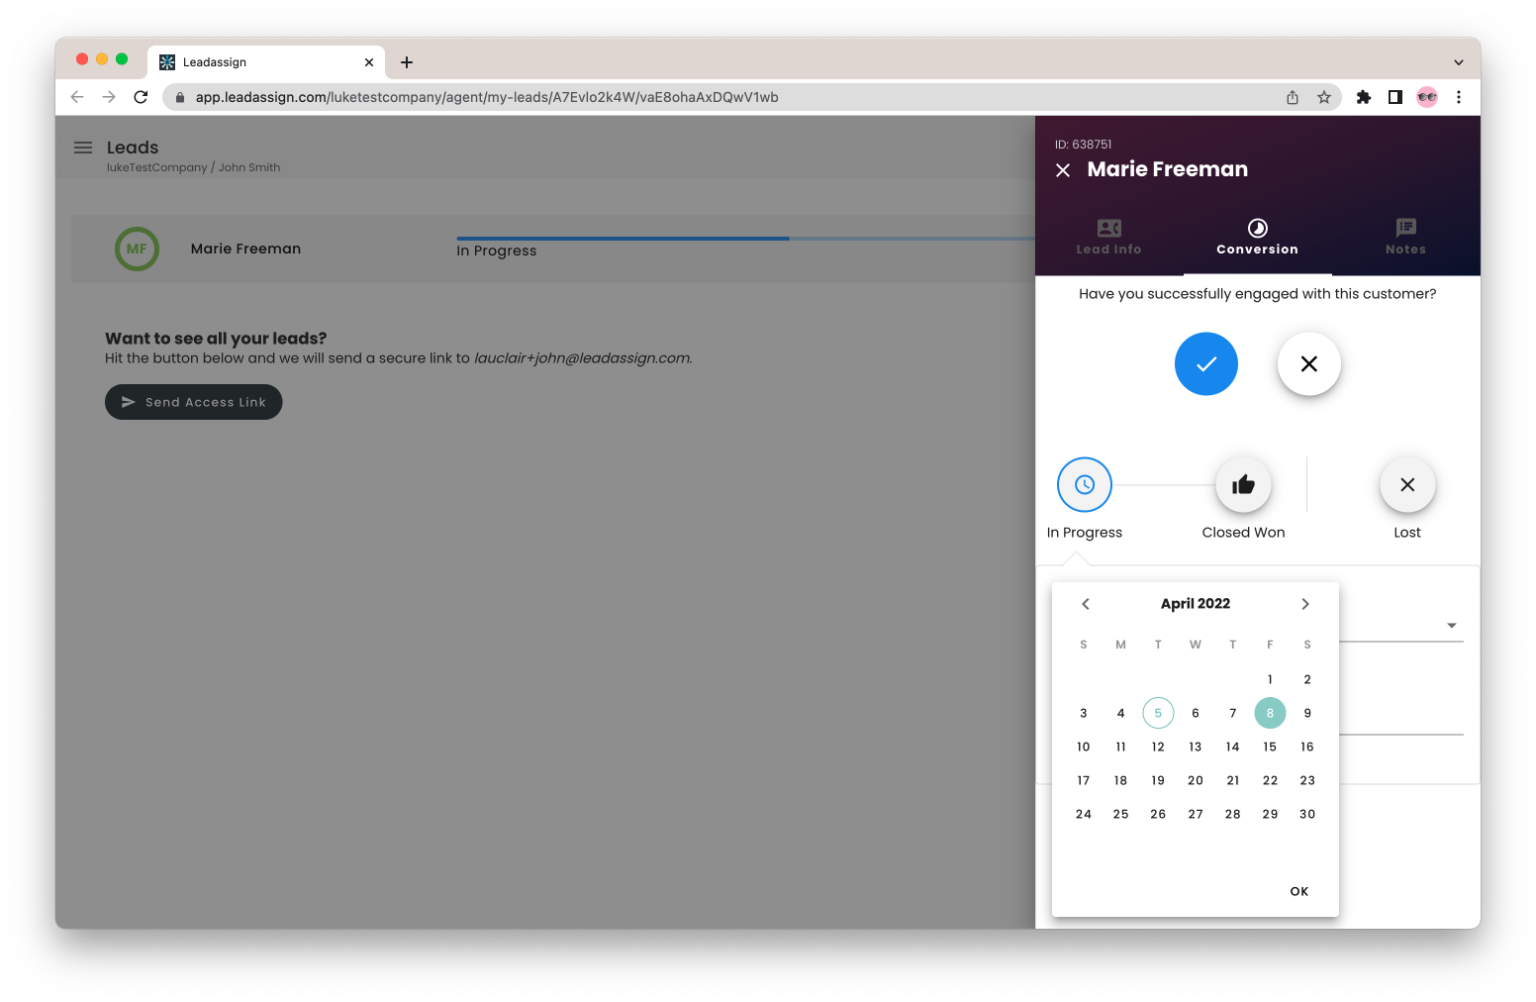
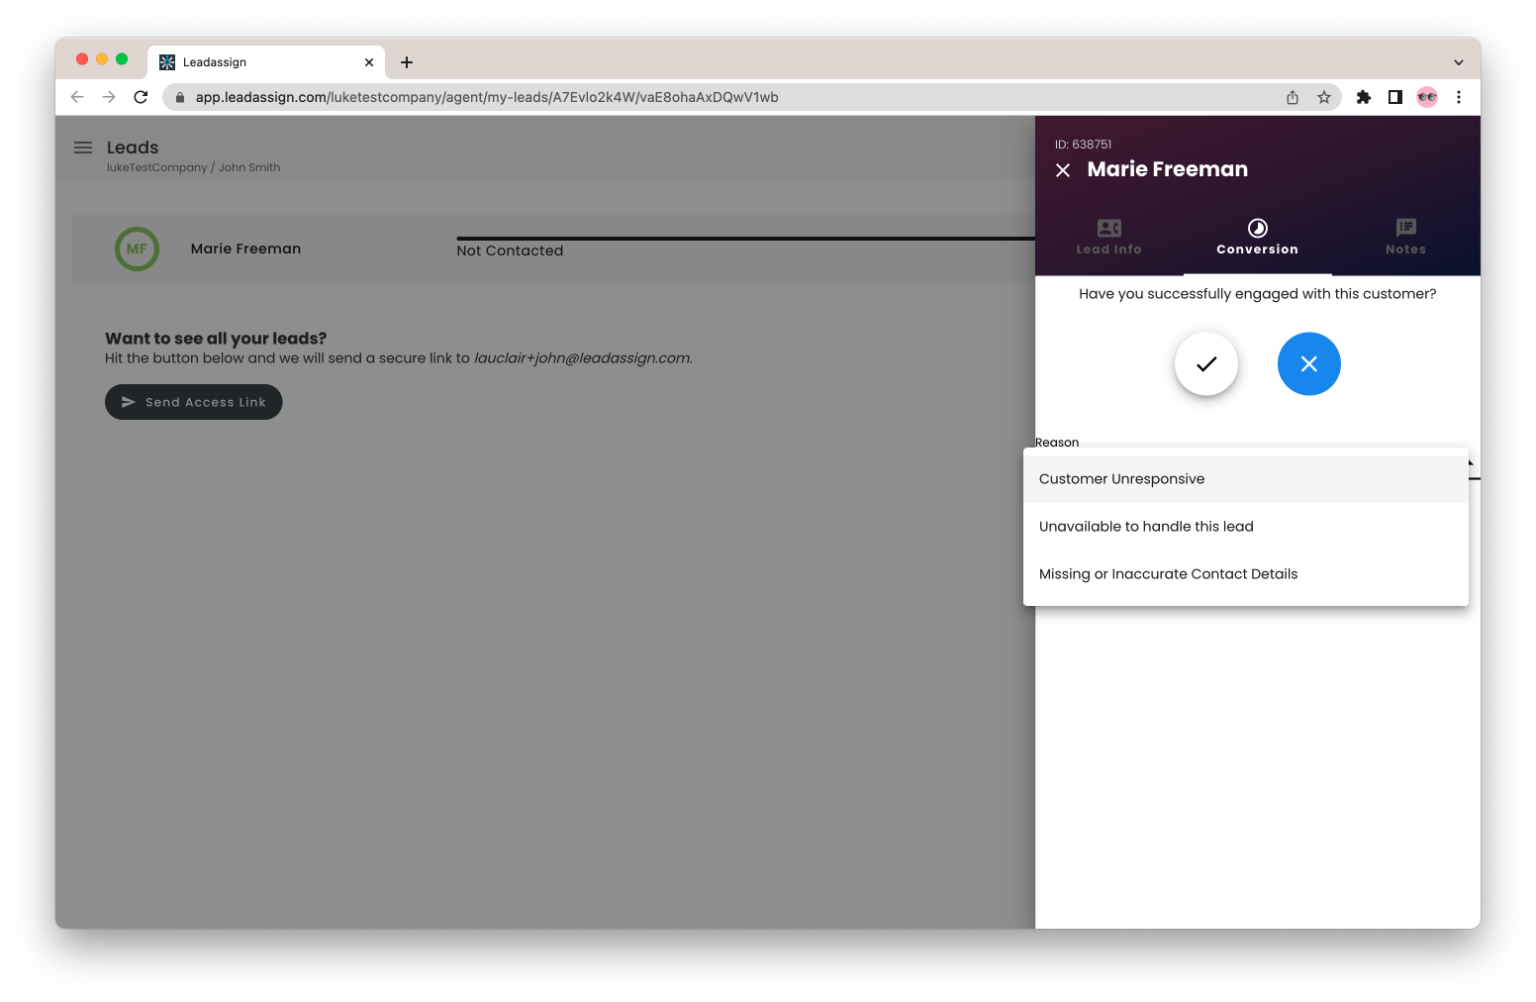
You will be asked if you successfully engaged with the lead. Answering this will give you some more options.
Lead Assign provides functionality to allow you to manage the lead through to close.
If engaged, selecting the buying stage via the dropdown is important and should be considered mandatory. It will allow you to focus on high producing lead sources for future campaigns and the elimination of those that aren’t.
Best Practices:
Set the appropriate buying stage
You can add next follow-up dates as a reminder
It is best practice to add the expected purchase items and quantity as soon as you know.
If you have not engaged with the lead, simply select no and provide the appropriate reason from the dropdown.
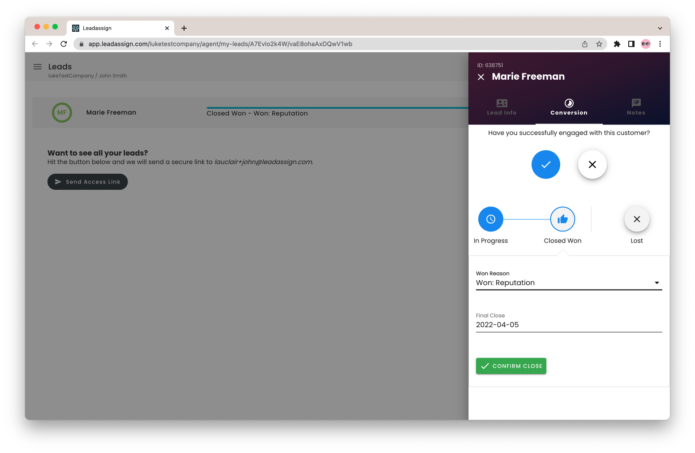
Closing the Lead - Won
Closing the lead in Lead Assign is the final feedback task. It provides valuable data that marketing will use to improve the overall quality of your leads.
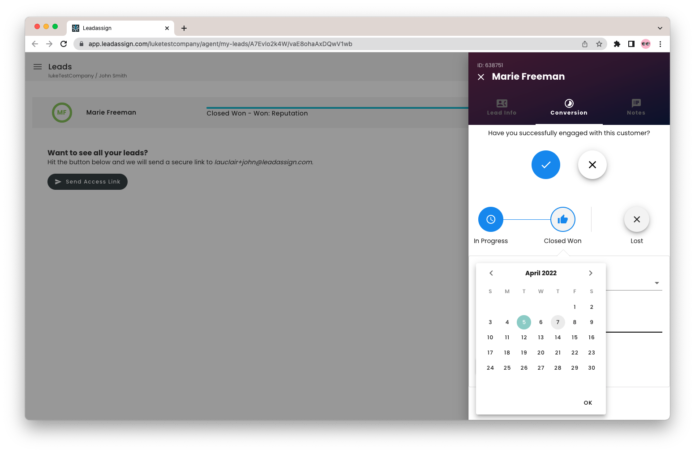
Clicking the “Close” button will change the dropdown for status from “Buying Stage” to “Won Reasons”
You can add the actual close date of the deal if different from your previously entered close date. If you know the OPG code, please provide in the notes field.
Select the appropriate reason from the dropdown. The last step is to hit the “confirm Close” button. Doing so closes the lead and changes the status to closed.
Closing the Lead - Lost
If the lead is lost, it should be reflected as lost by clicking the “lost” button.
The last step is to populate the lost reason from the dropdown items.
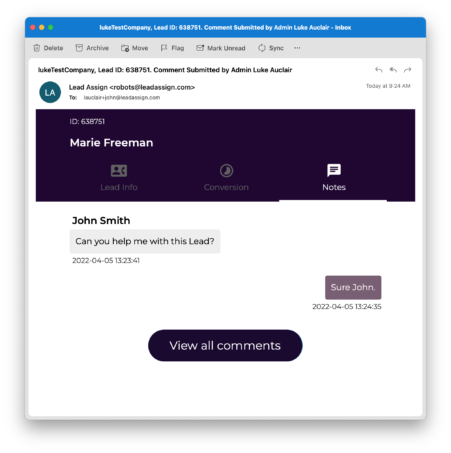
Comment Functionality
On occasion, an administrator may need to ask you a question. If they do, you will receive an email notification. Simply click on the “Read and Reply” button and this will take you to the “admin comment” tab.
When the lead details open, the screen will be on the comments tab. Here you will see the audit and communication trail of the lead. When you add a message an admin will be notified.
The same comment capabilities exist when you access all your leads (covered in the next section).
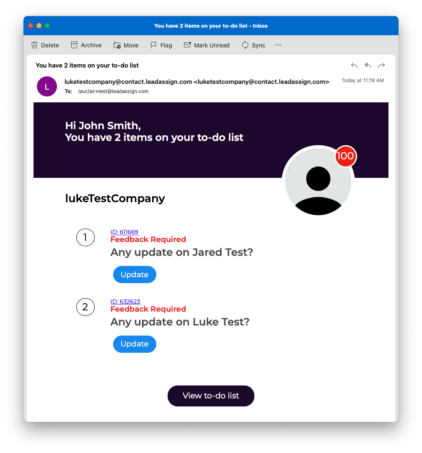
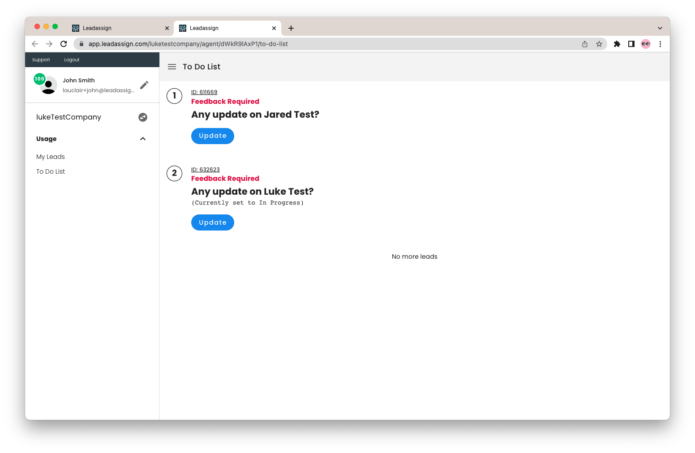
To-Do List
When a leads status hasn’t been completely updated and more information is required, it will be added as an item to your To-Do list.
Clicking the incomplete information or the ‘Provide Feedback Now’ button at the bottom of the email will bring you to the lead page where you can update the current status.
Completing your To-Do list will improve you overall performance score which may be used as a metric in the lead matching algorithms.
You can also access your To Do list from the left side bar or click the bell icon in the top right corner. This will bring you to a list of all your leads that currently need updated feedback.
Simply click update to go to the lead page where you can provide updated information.
Email Notifications
Lead Offer Email
When you receive a lead opportunity as an email or an sms, simply click on the “Accept or Decline” button. If accepting via a mobile device you can accept via SMS or via Email.
Lead Acceptance Email
After accepting the lead you will receive an email with the lead details and contact information
Lead Feedback Email
When you receive a lead opportunity as an email or an sms, simply click on the “Accept or Decline” button. If accepting via a mobile device you can accept via SMS or via Email.
We use cookies on our website to give you the most relevant experience by remembering your preferences and repeat visits. By clicking “Accept All”, or by continuing to use the site, you consent to the use of ALL the cookies. However, you may visit "Cookie Settings" to provide a controlled consent.
This website uses cookies to improve your experience while you navigate through the website. Out of these, the cookies that are categorized as necessary are stored on your browser as they are essential for the working of basic functionalities of the website. We also use third-party cookies that help us analyze and understand how you use this website. These cookies will be stored in your browser only with your consent. You also have the option to opt-out of these cookies. But opting out of some of these cookies may affect your browsing experience.
Necessary cookies are absolutely essential for the website to function properly. These cookies ensure basic functionalities and security features of the website, anonymously.
Cookie
Duration
Description
cookielawinfo-checkbox-analytics
11 months
This cookie is set by GDPR Cookie Consent plugin. The cookie is used to store the user consent for the cookies in the category "Analytics".
cookielawinfo-checkbox-functional
11 months
The cookie is set by GDPR cookie consent to record the user consent for the cookies in the category "Functional".
cookielawinfo-checkbox-necessary
11 months
This cookie is set by GDPR Cookie Consent plugin. The cookies is used to store the user consent for the cookies in the category "Necessary".
cookielawinfo-checkbox-others
11 months
This cookie is set by GDPR Cookie Consent plugin. The cookie is used to store the user consent for the cookies in the category "Other.
cookielawinfo-checkbox-performance
11 months
This cookie is set by GDPR Cookie Consent plugin. The cookie is used to store the user consent for the cookies in the category "Performance".
viewed_cookie_policy
11 months
The cookie is set by the GDPR Cookie Consent plugin and is used to store whether or not user has consented to the use of cookies. It does not store any personal data.
Functional cookies help to perform certain functionalities like sharing the content of the website on social media platforms, collect feedbacks, and other third-party features.
Performance cookies are used to understand and analyze the key performance indexes of the website which helps in delivering a better user experience for the visitors.
Analytical cookies are used to understand how visitors interact with the website. These cookies help provide information on metrics the number of visitors, bounce rate, traffic source, etc.
Advertisement cookies are used to provide visitors with relevant ads and marketing campaigns. These cookies track visitors across websites and collect information to provide customized ads.